

The Editing Company
The Editing Company
Toronto, Ontario
Toronto, Ontario
Telephone: (416) 924-3856
RECENT POSTS


TEC Blog
Categories
Show All- Editing
- Grammar
- Usage
- Style
- Editor/writer
- Publishing
- Business
- Writing
- Writers support group
- Event
- Proofreading
- Copyright and permissions
- Usage
- Book reviews
- Editing new media
- Technology
- Books & libraries
- Ttc stories
- Editing & marketing
- Office happenings
- Social media & community
- Language & editing
- Social media
- Editing & marketing
- Indexing
- Book design
- Tec clients
- Guest blogger
- Creative women doing sixty
- Book clubs
- Books and reading
- Ebook technology & services
- Editing numbers
- Editing & technologies
- Opera, movies
Why Is My Document So Marked-Up? Understanding Track Changes and the Editing of Your Document
by Lesley-Anne Longo
Published at 2021-04-21
Picture this: you’re an author who has just sent your first manuscript off to an editor for a professional copy edit. Eventually, the editor returns the manuscript to you, you open the file with excitement, and you see…a sea of red marks?
If you’ve written a document — be it a book, a research report, or an article — and you’re working with an editor for the first time, your first introduction to working with Microsoft Word’s Track Changes function can be a bit overwhelming. But it doesn’t have to be!
Why Use Track Changes At All?
Track Changes is an important tool in the editing process because it allows you to keep track of any changes made to the document. Both writer and editor can see how the original document read before the changes, and how it will read if the changes/edits are implemented. Track Changes also allows the editor and writer to highlight words, phrases, or sections, and leave comments with their feedback, suggestions, or queries.
If you open up a heavily edited document, the markup can seem intimidating, but once you take a closer look, I’m confident you’ll feel much more comfortable with working through the changes and using the Track Changes function yourself.
Below, I’ll walk you through the four main types of editing markup you’ll see in a document edited in Microsoft Word. To see all the markup properly, it’s best to make sure that the review settings for the document are set to “All Markup.” To do this, click on “Review” (located in the tool bar at the top of the Microsoft Word screen), look at the section labelled “Tracking,” and select “All Markup” from the dropdown list of options for viewing the editing markup.
Strikethroughs
The most noticeable editing markup you’ll see is likely text that has a line through it, also known as a strikethrough. This indicates that the editor has deleted the original text. This could apply to a whole section, a paragraph, a sentence, a word, or even just one letter (for example, if you have a spelling error or typo). Below are a couple of examples of strikethroughs in action:
Strikethroughs can show a deletion of just one lletter in a word.
Or, they can delete lots and lots and lots of words. Or even a full sentence!
Strikethroughs can have a somewhat aggressive appearance, especially if the editor has marked a lot of words or text for deletion. However, if you take a closer look (and read the editor’s explanation in comments, if they’ve left one), it’s likely you’ll reread the sentence and think, Hmm, that does read a lot better without those extra words, or, Hey, that sentence really was breaking up that paragraph, and it reads much more smoothly now.
Insertions
You’ll likely see this kind of markup combined with strikethroughs quite a bit in an edited document. An insertion is text that the editor has added to the document, and it will show up as text in a different colour (one that matches the rest of the markup, if you’re only working with one editor) and it will be underlined. This is, in my opinion, why authors might be a bit overwhelmed when they open a document — if an editor has deleted words and added new ones to restructure a sentence, or rephrase an idea, the combination of the coloured new text and the coloured text that has a strikethrough running through it can make things look a lot crazier than they really are.
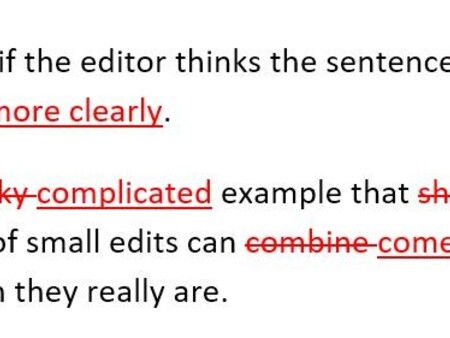
Below, you can see examples of inserted text, one with just a straight insertion, and two in combination with deleted text:
Text can be inserted because the sentence has a missing word or letter.
It can also be inserted if the editor thinks the sentence needs work could be rephrased to read more clearly.
This is a very more tricky complicated example that shows demonstrates how a bunch number of small edits can combine come together to look more crazy complicated than they really are.
Comments/Balloons
Balloons are little comment bubbles that you might see to the right of your document’s text located in the right-hand margin. Editors often use them to highlight a sentence, phrase, or concept that they need to query. They can be helpful because the author can then “reply” to the comment bubble, sort of like an in-document messaging system, which gives the editor more directions or clarification on how they want to handle that particular section of text.
Formatting
You may also see callouts in the margin (alongside the comments) that detail formatting changes the editor has made, whether it’s italicizing text, inserting a paragraph break, or indenting a line. These are changes to the appearance of the text, not the content.
I will warn you that it can sometimes be more prudent to turn off Track Changes when you’re making either very large or many small formatting changes, such as changing the line spacing for a section, or italicizing lots of fiddly terms. The reason for this is because these callouts for each formatting change can very quickly get out of control and crowd out the margin, leaving no room for comments, or anything else. The author and editor should communicate and discuss any large-scale formatting changes ahead of time, and as long as everyone is agreed on the plan of action, making these changes with Track Changes turned off can really streamline and simplify the look of the edited document, which is beneficial for both editor and author.
So, Take a Breath and Don’t Panic
Opening a heavily edited document can be a shock — there are so many lines all over the place, a lot of coloured text, and comments everywhere … we get it! Just take a deep breath and start going through the text slowly, sentence by sentence, and soon you’ll get the hang of how the markup works.
If it helps, you can change the Review settings to show what the text would look like with the edits accepted and incorporated by selecting Simple Markup from the dropdown menu in the Tracking section of the Review tab. This won’t accept the edits for you, but it will show you what the text would look like if you were to accept the edits. You can easily restore the marked-up view by selecting All Markup from the same dropdown menu.
As the author, you’ll have to go through and accept or reject each individual edit (well, you can do a global accepting of all edits, but we really don’t recommend it), so you’ll have to get in there sooner or later. Just be deliberate, take your time, and evaluate each edit one by one — I have every confidence that you’ll pick things up sooner than you think!
A Handy Resource for You
For a more in-depth explanation of the ins and outs of Track Changes (with screenshots to illustrate instructions!) be sure to check out our Working with Track Changes: A Guide. It’s a great resource for those just starting out with Track Changes, and has helpful step-by-step instructions that are explained in plain language. Take a look!